
FFmpeg is a powerful collection of libraries and tools that allows you to work with media files. You can use it to convert video files between different formats, re-encode a video file with a different codec, extract image frames from a video file, and much more.
Installation
FFmpeg is available on multiple platforms, including Windows, macOS, and various Linux distributions.
For macOS, one easy way to install FFmpeg is via homebrew:
brew install ffmpeg
What is a media file?
Before we go into how to use FFmpeg, let’s look at what a media file is:
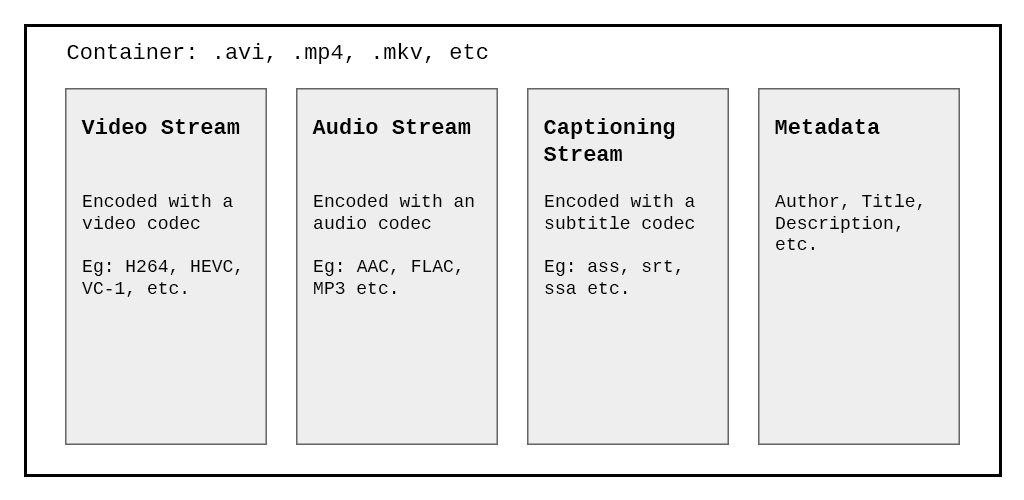
A media file consists of two components: the media container and its streams.
A media container is a wrapper around different streams. You are probably familiar with the file extensions of video files like .mp4 and .avi . These file extensions are named after the format of the container. The container determines how your media player or web browser will interact with the media file.
The container contains one or more streams. Think of a video stream as a video track in the media file. A media container usually consists of at least one video and audio stream. Streams are encoded using codecs. A codec is a set of algorithms used to compress a stream. The more efficient the codec, the better the file size to quality ratio.
Converting Media Files
Converting a media file can mean changing the format of the media container, for instance, changing a .mp4 container to a .mkv container. Or changing the codecs used to encode a stream, like encoding a video stream using HEVC instead of H264.
Selecting the right codecs and container formats sounds like a headache, but FFmpeg usually has good sensible defaults. It is usually able to use the right container and codecs automatically.
The simplest FFmpeg conversion command would look like this:
ffmpeg -i input.mov output.mp4
In the above command, we are telling ffmpeg to take an input.mov input file (specified by the -i file) and convert it into the output.mp4 output file. Recall that this means that we are changing the format of the media container. FFmpeg will re-encode the streams into the new container (if necessary) based on what the mp4 container supports.
FFmpeg Command Tool Syntax
The ffmpeg command-line tool has this general syntax:
ffmpeg [global_options] ([input_options] -i input_file) ([output_options] output_file)
ffmpeg consists of two parts: the input “files” (which can be regular files, pipes, network streams, etc.), specified by the -i option, and the output “files”. Note that you can have more than one input file and output file.
As a general rule, options are applied to the next specified file. Hence, the order in which you specify the options is important, and you can have the same option on the command line many times. Each option is applied to the next input or output file. Exceptions from this rule are the global options (e.g. verbosity level), which should be specified first.
Specifying FFmpeg Options
Options are modifiers applied to the next input or output file to change the resulting output from ffmpeg .
ffmpeg -i input.avi -r 24 output.avi
The above command uses the -r option flag to force the frame rate of output.avi to be 24 frames per second.
You can get a list of available options by using the command ffmpeg -h or by referring to FFmpeg’s documentation.
Selecting codecs
If you want to specify the codec used to encode a stream, instead of relying on FFmpeg’s automatic defaults, you can select the codec using the -c option flag.
ffmpeg -i input.mp4 -c:v libx265 -c:a aac output.mkv
The above command converts input.mp4 into output.mkv. The video stream is re-encoded using the libx265 codec and the audio stream using the aac codec. libx265 is an encoder that outputs the HEVC / H.265 video compression format.
The resulting output.mkv will be a Matroska video file. The file has a video track compressed using HEVC / H.265 standards and an audio track compressed using AAC standards.
FFmpeg Cheat Sheet
Here are some common commands I use:
Convert mp4 to mkv (HEVC)
ffmpeg -i input.mp4 -c:a copy -c:s copy -crf 18 -preset slow -c:v libx265 -pix_fmt yuv420p10le -map_metadata 0 -tag:v hvc1 output.mkv
The above command converts a mp4file into a mkv file. The video stream is re-encoded using libx265 , and the audio and caption streams are copied (using the -c copy option) to the output container without re-encoding.
Upscale a video by 2X
ffmpeg -i input.mp4 -vf "scale=iw*2:-1" output.mkv
This command upscales the video stream of input.mp4 by two times, as specified using the scale filter.
Preview FFmpeg output
ffplay -i input.mp4 -vf "scale=iw*2:-1"
The ffplay command allows you to get a preview of the end result of processing the input video with certain ffmpeg modifiers. You can see how a modifier will affect the video without the need to export the entire input video.
Convert a segment of a video to an animated gif
ffmpeg -ss 30 -t 5 -i input.mp4 -vf "fps=24,split[s0][s1];[s0]palettegen[p];[s1][p]paletteuse" -loop 0 output.gif
This command will skip the first 30 seconds of the input video (-ss 30) and create a 5-second (-t 5) an animated gif that loops infinitely (-loop 0).
This excellent StackExchange answer goes into deeper detail on explaining the above command.
I hope you got some useful pointers from this article. If you are interested in more articles about tech, be sure to subscribe to get notified whenever I publish a new article.


